We continue the
series about procedural generation in Unity.
Last time, we used Perlin Noise as the basis for surface generation. This approach makes it quite easy and quick to get a heightmap close to reality. Adding colors based on the height enhances the impression from it even more. The next step is to use a heightmap to build actual volumetric space.
The previous article was based on a series of videos from Sebastian Lague, which applied this algorithm to generate three-dimensional surfaces, but this is not the only available visualization option. Side-scroll, top-down, and isometric views also trendy among game creators. They have not lost their relevance with the development of three-dimensional graphics and allow you to give to the project a unique style and atmosphere. Unity is continuously working on expanding the tools available to developers, and tilemaps are one of such a relatively new tool that facilitates the creation of the above types of representations.
Tilemaps
Unity added the ability to work with 2d tiles in 2017, which simplified the creation of top-down and side-scrollers. A year later, hexagonal tiles and isometric maps also were added, the use of which is of great interest because hexagons have long been the basis for the Civilization series. And the isometric view is fundamental for most representatives of the RPG genre =) So let’s try to take the first step towards our role-playing game and transfer the map generated with Perlin Noise to the isometric space.
Goal
Use Unity isometric tilemaps to display heightmap generated by Perlin Noise.
Preparation
We will use the Perlin Noise generator from the previous article as the basis for this implementation.
Asset pack with tile from Devil’s Work.shop was used as the surface representation. We choose nine tiles from it.
Setting up isometric maps is a kinky process, which is very well described by Alice Hinton-Jones in the article Isometric 2D Environments with Tilemap, so it does not make sense to rewrite it.
Let’s list the steps taken to configure a tilemap part of this project:
Set Edit > Project Settings > Graphics > Camera Settings > Transparency Sort Mode - Custom Axis
Set Edit > Project Settings > Graphics > Camera Settings > Transparency Sort Axis - X=0 Y=1 Z=-0.289 - Z depends on the size of the tile, and you can find the algorithm for calculating it in Alice's article. First, take the Y dimension of your grid, multiply this value by negative 0.5, and subtract an additional 0.01 from it
Import tile assets as textures
Set Pixels Per Unit at 863 - real tile size in texture
Set Pivot at 0.4921, 0.7452 - the center of the top of the tile, as described in an Alice's article
Allow Read/Write of tile textures for test purpose
Create Isometric Z as Y tilemap object
Set in Grid object Y Cell Size at 0.577 - depends on the size of the tile, the calculation rules are also in the Alice article. To decide the correct Y grid value for the tiles, take the height of the base (or cap) of a single tile, and divide it by the width
Create an isometric palette with same Y Cell Size in Grid component at 0.577
Change the Tilemap Renderer > Mode component setting to Individual. This setting will allow you to work around the bug of calculating overlapping tiles with each other if the texture of the tiles is in different atlases. Use of Chunk option is possible when tile textures baked into one atlas, which you can do at the preparation of the production build stage
Perlin Noise
The noise generator from the previous article does not require any modifications and wholly migrated from the previous article
usingUnityEngine;publicstaticclassNoiseMapGenerator{publicstaticfloat[]GenerateNoiseMap(intwidth,intheight,intseed,floatscale,intoctaves,floatpersistence,floatlacunarity,Vector2offset){// An array of vertex data, a one-dimensional view will help get rid of unnecessary cycles later
float[]noiseMap=newfloat[width*height];// Seed element
System.Randomrand=newSystem.Random(seed);// Octave shift to get a more interesting picture with overlapping
Vector2[]octavesOffset=newVector2[octaves];for(inti=0;i<octaves;i++){// Also use external position shift
floatxOffset=rand.Next(-100000,100000)+offset.x;floatyOffset=rand.Next(-100000,100000)+offset.y;octavesOffset[i]=newVector2(xOffset/width,yOffset/height);}if(scale<0){scale=0.0001f;}// For a more visually pleasant zoom shift our view to the center
floathalfWidth=width/2f;floathalfHeight=height/2f;// Generate points for a heightmap
for(inty=0;y<height;y++){for(intx=0;x<width;x++){// Set the values for the first octave
floatamplitude=1;floatfrequency=1;floatnoiseHeight=0;floatsuperpositionCompensation=0;// Octave Overlay Processing
for(inti=0;i<octaves;i++){// Calculate the coordinates to get from Noise Perlin
floatxResult=(x-halfWidth)/scale*frequency+octavesOffset[i].x*frequency;floatyResult=(y-halfHeight)/scale*frequency+octavesOffset[i].y*frequency;// Obtaining Altitude from the PRNG
floatgeneratedValue=Mathf.PerlinNoise(xResult,yResult);// Octave overlay
noiseHeight+=generatedValue*amplitude;// Compensate octave overlay to stay in a range [0,1]
noiseHeight-=superpositionCompensation;// Calculation of amplitude, frequency and superposition compensation for the next octave
amplitude*=persistence;frequency*=lacunarity;superpositionCompensation=amplitude/2;}// Save heightmap point
// Due to the superposition of octaves, there is a chance of going out of the range [0,1]
noiseMap[y*width+x]=Mathf.Clamp01(noiseHeight);}}returnnoiseMap;}}
Preview
For testing purposes, part of the noise rendering to the color texture also transferred from the previous article. To avoid filling the height scale manually, we added its automatic filling from the array of tiles.
NoiseMapEditorGenerate - adding a button for generating a test texture in the editor of the object responsible for creating the tilemap (more about the extension of the Unity editor you can find in another our article):
usingUnityEditor;usingUnityEngine;[CustomEditor(typeof(TileMapHandler))]publicclassNoiseMapEditorGenerate:Editor{publicoverridevoidOnInspectorGUI(){// Get the component
TileMapHandlernoiseMap=(TileMapHandler)target;// Draw the standard view and listen for changes to generate a new map
if(DrawDefaultInspector()){noiseMap.GenerateMap();}// Add a button to regenerate the map
if(GUILayout.Button("Generate")){noiseMap.GenerateMap();}}}
NoiseMapRenderer - a class responsible for creating a colored texture from Perlin Noise, which allows easily configure parameters and test the results of the generator without switching to Play Mode:
usingSystem;usingSystem.Collections.Generic;usingUnityEngine;publicclassNoiseMapRenderer:MonoBehaviour{ [SerializeField]publicSpriteRendererspriteRenderer=null;// Determining the coloring of the map depending on the height
[Serializable]publicstructTerrainLevel{publicfloatheight;publicColorcolor;} [SerializeField]publicList<TerrainLevel>terrainLevel=newList<TerrainLevel>();// Create texture and sprite to display
publicvoidRenderMap(intwidth,intheight,float[]noiseMap){Texture2Dtexture=newTexture2D(width,height);texture.wrapMode=TextureWrapMode.Clamp;texture.filterMode=FilterMode.Point;texture.SetPixels(GenerateColorMap(noiseMap));texture.Apply();spriteRenderer.sprite=Sprite.Create(texture,newRect(0.0f,0.0f,texture.width,texture.height),newVector2(0.5f,0.5f),100.0f);}// Convert an array with noise data into an array of colors, depending on the height, for transmission to the texture
privateColor[]GenerateColorMap(float[]noiseMap){Color[]colorMap=newColor[noiseMap.Length];for(inti=0;i<noiseMap.Length;i++){// Base color with the highest value range
colorMap[i]=terrainLevel[terrainLevel.Count-1].color;foreach(varlevelinterrainLevel){// If the noise falls into a lower range, then use it
if(noiseMap[i]<level.height){colorMap[i]=level.color;break;}}}returncolorMap;}}
Isometric map generation
There are two methods to add height differentiation into isometric tilemaps, an overview of both of them you can find in Alice’s article. We choose the method based on the usage of the Z component. It saves us from additional tilemap objects creation for every elevation level.
Compared to the previous article, the height scale was evenly distributed, which also gave a good result, from a visual point of view, but reduced the time to fill the surface level scale.
usingSystem.Collections.Generic;usingUnityEngine;usingUnityEngine.Tilemaps;publicclassTileMapHandler:MonoBehaviour{// Map Object
publicTilemaptilemap=null;// List with tiles
publicList<Tile>tileList=newList<Tile>();// Input data for our noise generator
[SerializeField]publicintwidth; [SerializeField]publicintheight; [SerializeField]publicfloatscale; [SerializeField]publicintoctaves; [SerializeField]publicfloatpersistence; [SerializeField]publicfloatlacunarity; [SerializeField]publicintseed; [SerializeField]publicVector2offset;// Start is called before the first frame update
voidStart(){// Hide the object with the test texture
NoiseMapRenderermapRenderer=FindObjectOfType<NoiseMapRenderer>();mapRenderer.gameObject.SetActive(false);// Generate a height map
float[]noiseMap=NoiseMapGenerator.GenerateNoiseMap(width,height,seed,scale,octaves,persistence,lacunarity,offset);// Create Tiles
for(inty=0;y<width;y++){for(intx=0;x<height;x++){// Noise level for the current tile
floatnoiseHeight=noiseMap[width*y+x];// The levels of the generated surface are evenly distributed on the noise scale
// "Stretch" the noise scale to the size of the array of tiles
floatcolorHeight=noiseHeight*tileList.Count;// Select a tile below the resulting value
intcolorIndex=Mathf.FloorToInt(colorHeight);// Consider addressing in arrays for maximum noise values
if(colorIndex==tileList.Count){colorIndex=tileList.Count-1;}// Tile assets allow you to use a height of 2z
// Therefore, we “stretch” the noise scale more than 2 times with color
floattileHeight=noiseHeight*tileList.Count*2;inttileHeightIndex=Mathf.FloorToInt(tileHeight);// We shift the obtained height to align the tiles with water and the first level of sand
tileHeightIndex-=4;if(tileHeightIndex<0){tileHeightIndex=0;}// Take an asset tile depending on the converted noise level
Tiletile=tileList[colorIndex];// Set the tile height depending on the converted noise level
Vector3Intp=newVector3Int(x-width/2,y-height/2,tileHeightIndex);tilemap.SetTile(p,tile);}}}// Function for generating a test texture with the parameters specified for the noise generator
// Used from the editor extension NoiseMapEditorGenerate
publicvoidGenerateMap(){// Generate a heightmap
float[]noiseMap=NoiseMapGenerator.GenerateNoiseMap(width,height,seed,scale,octaves,persistence,lacunarity,offset);// Depending on the filling of the array with tile assets, we generate a uniformly distributed color dependence on the noise height
List<NoiseMapRenderer.TerrainLevel>tl=newList<NoiseMapRenderer.TerrainLevel>();// The upper border of the range determines the color, so divide the scale into equal segments and shift it up
floatheightOffset=1.0f/tileList.Count;for(inti=0;i<tileList.Count;i++){// Take the color from the texture of the asset tile
Colorcolor=tileList[i].sprite.texture.GetPixel(tileList[i].sprite.texture.width/2,tileList[i].sprite.texture.height/2);// Create a new color-noise level
NoiseMapRenderer.TerrainLevellev=newNoiseMapRenderer.TerrainLevel();lev.color=color;// Convert the index to a position on the scale with the range [0,1] and move up
lev.height=Mathf.InverseLerp(0,tileList.Count,i)+heightOffset;// Save a new color-noise level
tl.Add(lev);}// Apply a new color-noise scale and generate a texture based on it from the specified parameters
NoiseMapRenderermapRenderer=FindObjectOfType<NoiseMapRenderer>();mapRenderer.terrainLevel=tl;mapRenderer.RenderMap(width,height,noiseMap);}}
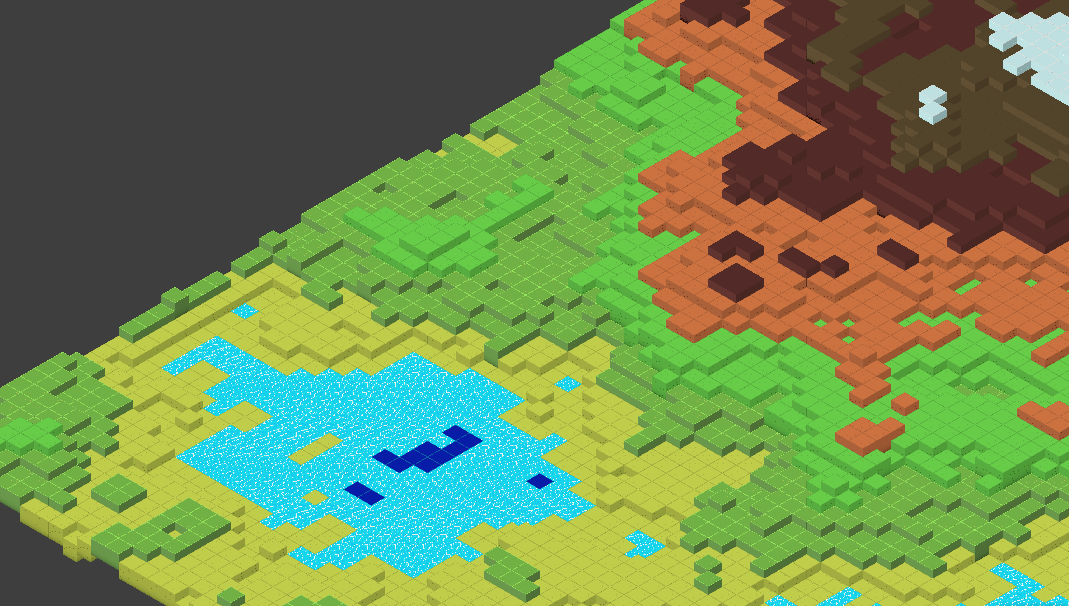
Result
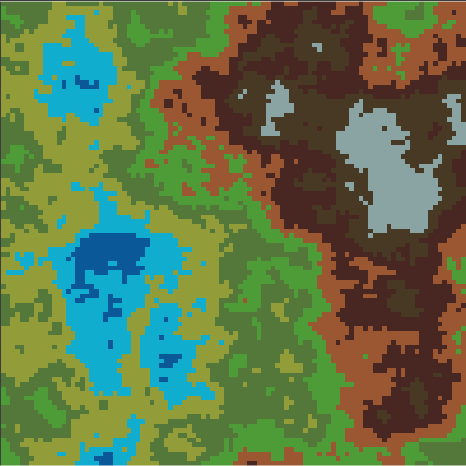
The test texture of the generated map looks like this:
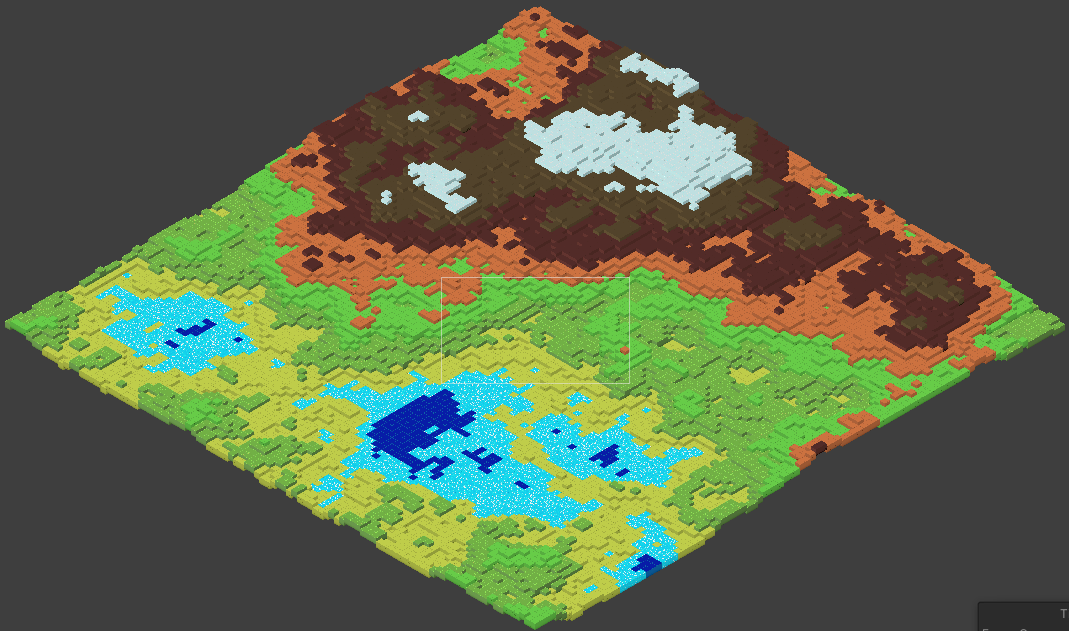
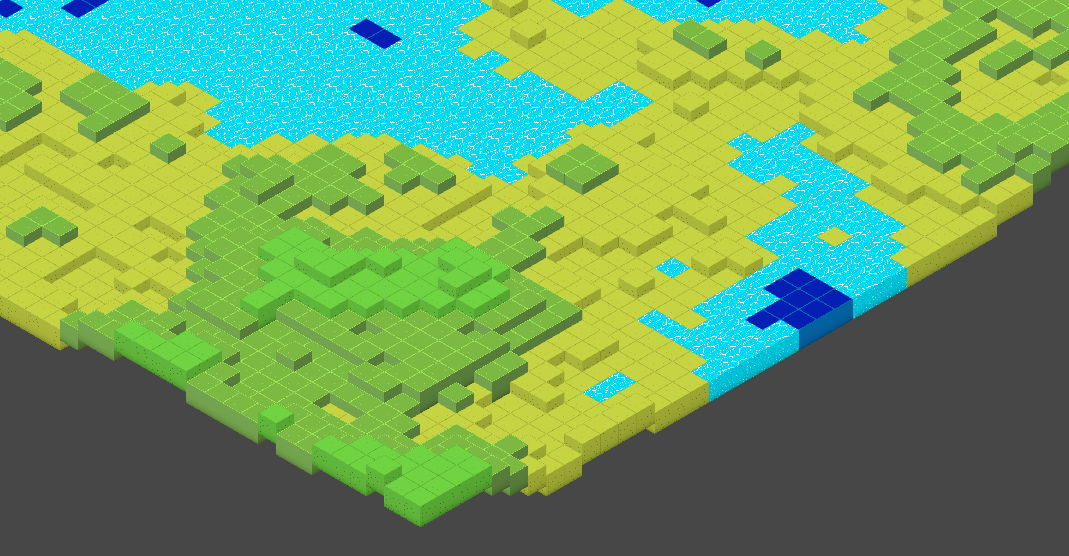
Isometric map generated from the same coordinates:
All water levels and the first level of sand are aligned to provide further credibility.
Conclusion
Basic usage of tilemaps is not a big deal. But do not forget that bringing the tiles to a visually acceptable level requires a lot of work with assets. And the work with the tilemaps in our example is far from complete. It is necessary to add the possibility of increasing the height of the map, which will require filling the free space with height differences more than 2z. For free movement around the map chunk loading system must be implemented. Adding dynamic objects will require the creation of a movement system that considers elevations, possibly using standard colliders. And visual improvement also needs a mechanism for joining tiles with different types of surfaces. We will deal with all these subjects in the next articles of the
cycle about procedural generation. See you next time! =)