The previous post about procedural generation gives us an excellent opportunity to look at the possibilities of customization of the Unity Editor.
Unity Editor is a potent and flexible tool that allows you to create and quite flexibly customize controls. The primary purpose of such components is to provide the ability to configure everything without code writing. In a sense, this turns Unity into a fifth-generation programming language.
Fifth-generation
Programming languages usually divided into five generations. If you go straight to the fifth, then briefly it can be described as a system for creating application programs using visual development tools, without programming knowledge. In the corporate world, this is a prevalent topic. Every effective manager dreams of giving any analyst or designer a tool so that he can do everything without the participation of a programmer.
In my opinion, game development came to the creation of such systems most closely. The most striking example, of course, are blueprints in the UnrealEngine. Unity has a large set of third-party assets for the same purpose and has been building its Visual Scripting engine for several years now. Version 2020 promises a preview version of it, although this task is not with the highest priority.
Of course, the main advantage of this approach is the lowering of the entry threshold. If we take the same example with blueprints, then with their help, it is quite possible to make a full-fledged game without using code, so everyone has the same possibilities. Or at least it seems like that before you begin resolving performance troubles.
As a tradeoff, you will receive a specific exchange of knowledge when instead of copying a piece of code, you have to repeat the picture from StackOverflow in your blueprint. And also, a rather big problem is the merge of such formats in distributed development. The most common solution, in this case, is the ban on simultaneous work with blueprints for several people.
If we put aside visual programming and additional assets in Unity, then the basic mechanisms for changing the display of object parameters or the addition of custom editors can also greatly simplify life. For example, let’s use the project that we implement in a previous post and create two improvements:
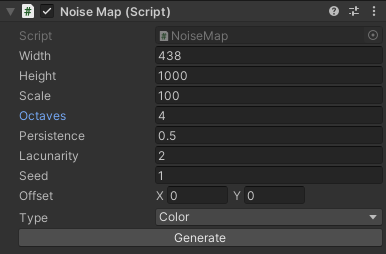
Add the ability to generate a heightmap from the editor, which will allow testing the result without going to Playmode
Create a custom color-height editor, which will significantly facilitate the settings
CustomEditor
This editor extension allows you to change the appearance of standard components to your needs. As an example, we add the map generation button directly in the editor, without going to Playmode
usingUnityEditor;usingUnityEngine;[CustomEditor(typeof(NoiseMap))]publicclassNoiseMapEditorGenerate:Editor{publicoverridevoidOnInspectorGUI(){// Get the component
NoiseMapnoiseMap=(NoiseMap)target;// Draw the standard view and listen for changes to generate a new map
if(DrawDefaultInspector()){noiseMap.GenerateMap();}// Add a button to regenerate the map
if(GUILayout.Button("Generate")){noiseMap.GenerateMap();}}}
As a result, the NoiseMap component will receive an additional button that will create and display a map in Renderer without scene launching.
CustomPropertyDrawer and EditorWindow
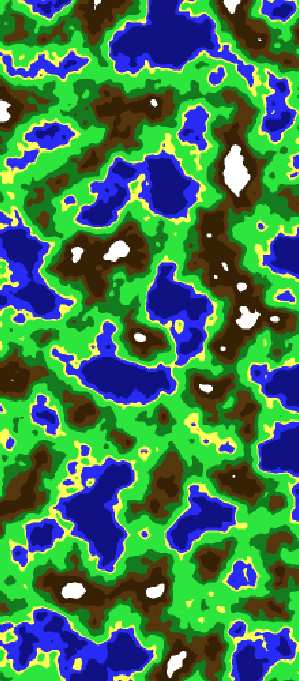
Let me remind you that previously, we generated a heightmap based on Perlin Noise.
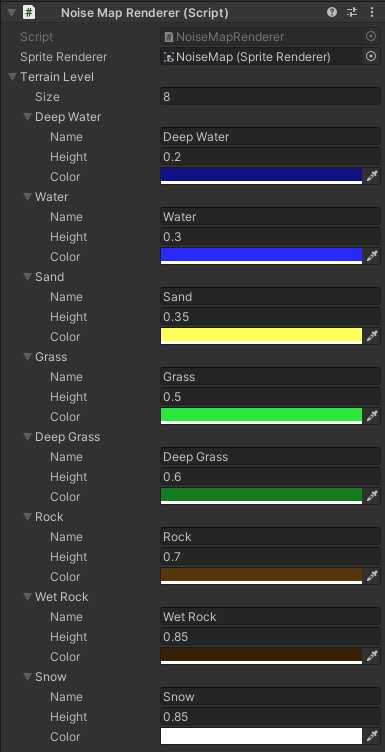
The color adjustment took place through an object of type List and looked like this:
As a result, adding color to the middle of the range requires manual transfer of all other values, which is not a very pleasant experience. As an alternative to the original method, we can create a custom color editor using EditorWindow.
usingSystem;usingSystem.Collections.Generic;usingUnityEngine;[Serializable]publicclassTerrainLevels{// The structure responsible for color
[Serializable]publicstructColorKey{ [SerializeField]privatestringname; [SerializeField]privateColorcolor; [SerializeField]privatefloatheight;publicColorKey(stringname,Colorcolor,floatheight){this.name=name;this.color=color;this.height=height;}publicstringName=>name;publicColorColor=>color;publicfloatHeight=>height;} [SerializeField]privateList<ColorKey>levels=newList<ColorKey>();// Number of available colors
publicintLevelsCount=>levels.Count;// Base constructor
publicTerrainLevels(){levels.Add(newColorKey("White",Color.white,1));}// Match color to height
publicColorHeightToColor(floatheight){// Base is the highest color
ColorretColor=levels[levels.Count-1].Color;foreach(varlevelinlevels){// If we find the color below, then select it
if(height<level.Height){retColor=level.Color;break;}}returnretColor;}// Texture for vertical ruler
publicTexture2DGenerateTextureVertical(intheight){Texture2Dtexture=newTexture2D(1,height);returnFillTexture(texture,height);}// Texture for the horizontal ruler
publicTexture2DGenerateTextureHorizontal(intwidth){Texture2Dtexture=newTexture2D(width,1);returnFillTexture(texture,width);}// Fill the texture with the color of heights
privateTexture2DFillTexture(Texture2Dtexture,intsize){texture.wrapMode=TextureWrapMode.Clamp;texture.filterMode=FilterMode.Point;// Easier to set the texture from an entire array of colors at once
Color[]colors=newColor[size];for(inti=0;i<size;i++){// Fill the color bar
colors[i]=HeightToColor((float)i/(size-1));}texture.SetPixels(colors);texture.Apply();returntexture;}// Get color data
publicColorKeyGetKey(inti){returnlevels[i];}// Add color
publicintAddKey(Colorcolor,floatheight){ColorKeynewKey=newColorKey("New key",color,height);for(inti=0;i<levels.Count;i++){if(newKey.Height<levels[i].Height){// Keep List sorted by heights
levels.Insert(i,newKey);returni;}}levels.Add(newKey);returnlevels.Count-1;}// Remove the color
publicvoidRemoveKey(intindex){if(levels.Count>1){levels.RemoveAt(index);}}// Update color
publicvoidUpdateKeyColor(stringname,intindex,ColornewColor){levels[index]=newColorKey(name,newColor,levels[index].Height);}// Update the color position on the scale
publicintUpdateKeyHeight(intkeyIndex,floatnewHeight){Colorcol=levels[keyIndex].Color;RemoveKey(keyIndex);returnAddKey(col,newHeight);}}
Custom property renderer for our color ruler class
usingUnityEditor;usingUnityEngine;[CustomPropertyDrawer(typeof(TerrainLevels))]publicclassTerrainLevelsPropertyDrawer:PropertyDrawer{publicoverridevoidOnGUI(Rectposition,SerializedPropertyproperty,GUIContentlabel){EventguiEvent=Event.current;// Get an object with a ruler of colors
TerrainLevelsterrainLevels=(TerrainLevels)fieldInfo.GetValue(property.serializedObject.targetObject);// Calculate the size of the component title and the rectangle to draw the ruler
floatlabelWidth=GUI.skin.label.CalcSize(label).x+5;RecttextureRect=newRect(position.x+labelWidth,position.y,position.width-labelWidth,position.height);// Redraw the ruler
if(guiEvent.type==EventType.Repaint){GUI.Label(position,label);GUI.DrawTexture(textureRect,terrainLevels.GenerateTextureHorizontal((int)position.width));}// Open the editor window
if(guiEvent.type==EventType.MouseDown&&guiEvent.button==0&&textureRect.Contains(guiEvent.mousePosition)){TerrainLevelsEditorwindow=EditorWindow.GetWindow<TerrainLevelsEditor>();window.SetTerrainLevels(terrainLevels);}}}
usingUnityEditor;usingUnityEngine;usingRandom=UnityEngine.Random;publicclassTerrainLevelsEditor:EditorWindow{// Colors by height structure
privateTerrainLevels_terrainLevels;// Rectangle to draw the ruler
privateRect_levelRulerRect;// Rectangles of final colors
privateRect[]_keyRects;// Ruler width
privateconstintLevelRullerWidth=25;// Key dimensions
privateconstintBorderSize=10;privateconstfloatKeyWidth=60;privateconstfloatKeyHeight=20;// Editing support
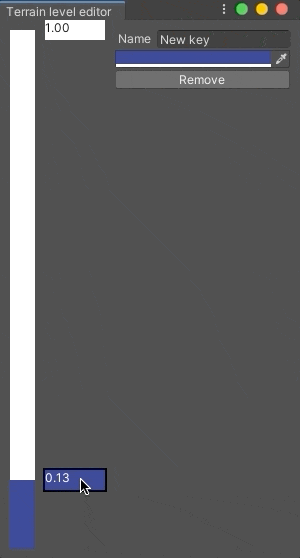
privatebool_mouseDown=false;privateint_selectedKeyIndex=0;privatebool_repaint=false;privatevoidOnEnable(){// Set the title and size parameters on window opening
titleContent.text="Terrain level editor";position.Set(position.x,position.y,300,400);minSize=newVector2(300,400);maxSize=newVector2(300,1500);}// Mark the scene dirty when closing the editor
privatevoidOnDisable(){UnityEditor.SceneManagement.EditorSceneManager.MarkSceneDirty(UnityEngine.SceneManagement.SceneManager.GetActiveScene());}// Pass the line of colors to the editor
publicvoidSetTerrainLevels(TerrainLevelslevels){_terrainLevels=levels;}privatevoidOnGUI(){// Basic editor rendering
Draw();Input();if(_repaint){_repaint=false;Repaint();}}privatevoidDraw(){// Draw a colors ruler
_levelRulerRect=newRect(BorderSize,BorderSize,LevelRullerWidth,position.height-BorderSize*2);GUI.DrawTexture(_levelRulerRect,_terrainLevels.GenerateTextureVertical((int)_levelRulerRect.height));// Draw specific colors
_keyRects=newRect[_terrainLevels.LevelsCount];for(inti=0;i<_terrainLevels.LevelsCount;i++){TerrainLevels.ColorKeykey=_terrainLevels.GetKey(i);RectkeyRect=newRect(_levelRulerRect.xMax+BorderSize,_levelRulerRect.height-_levelRulerRect.height*key.Height,KeyWidth,KeyHeight);// For the currently selected color, draw a frame
if(i==_selectedKeyIndex){EditorGUI.DrawRect(newRect(keyRect.x-2,keyRect.y-2,keyRect.width+4,keyRect.height+4),Color.black);}// Draw the color
EditorGUI.DrawRect(keyRect,key.Color);// Depending on the brightness of a particular color, select the font color, for readability purpose
floatbrightness=key.Color.r*0.3f+key.Color.g*0.59f+key.Color.b*0.11f;GUIStylestyle=newGUIStyle();style.normal.textColor=brightness<0.4?Color.white:Color.black;// On the rectangle with the color, we impose the height value
EditorGUI.LabelField(keyRect,key.Height.ToString("F"),style);_keyRects[i]=keyRect;}// Rectangle to display color settings fields
RectsettingsRect=newRect(BorderSize*3+LevelRullerWidth+KeyWidth,BorderSize,position.width-(BorderSize*4+LevelRullerWidth+KeyWidth),position.height-BorderSize*2);GUILayout.BeginArea(settingsRect);// Listen to the change of parameters
EditorGUI.BeginChangeCheck();// Name input field for color
GUILayout.BeginHorizontal();GUILayout.Label("Name");stringnameText=EditorGUILayout.TextField(_terrainLevels.GetKey(_selectedKeyIndex).Name);GUILayout.EndHorizontal();// Select the color itself
ColornewColor=EditorGUILayout.ColorField(_terrainLevels.GetKey(_selectedKeyIndex).Color);// When changing the parameters, update the color in the ruler
if(EditorGUI.EndChangeCheck()){_terrainLevels.UpdateKeyColor(nameText,_selectedKeyIndex,newColor);}// Button to delete color
if(GUILayout.Button("Remove")){_terrainLevels.RemoveKey(_selectedKeyIndex);if(_selectedKeyIndex>=_terrainLevels.LevelsCount){_selectedKeyIndex--;_repaint=true;}}GUILayout.EndArea();}privatevoidInput(){EventguiEvent=Event.current;// Add color by mouse click on the editor
if(guiEvent.type==EventType.MouseDown&&guiEvent.button==0){for(inti=0;i<_keyRects.Length;i++){if(_keyRects[i].Contains(guiEvent.mousePosition)){_mouseDown=true;_selectedKeyIndex=i;_repaint=true;break;}}if(!_mouseDown){// Initialize with random color
ColorrandomColor=newColor(Random.value,Random.value,Random.value);// Define the height for the color in the range [0,1], according to the coordinates relative to the ruler
floatkeyHeight=Mathf.InverseLerp(_levelRulerRect.y,_levelRulerRect.yMax,guiEvent.mousePosition.y);// The color scale is directed back to the coordinates of the editor
_selectedKeyIndex=_terrainLevels.AddKey(randomColor,1-keyHeight);_mouseDown=true;_repaint=true;}}// Reset Click Tracking
if(guiEvent.type==EventType.MouseUp&&guiEvent.button==0){_mouseDown=false;}// Drag and drop colors when moving the mouse
if(_mouseDown&&guiEvent.type==EventType.MouseDrag&&guiEvent.button==0){// Define the height for the color in the range [0,1], according to the coordinates relative to the ruler
floatkeyHeight=Mathf.InverseLerp(_levelRulerRect.y,_levelRulerRect.yMax,guiEvent.mousePosition.y);// The color scale is directed back to the coordinates of the editor
_selectedKeyIndex=_terrainLevels.UpdateKeyHeight(_selectedKeyIndex,1-keyHeight);_repaint=true;}}}
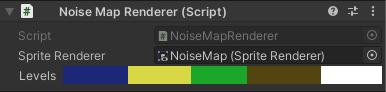
As a result, our custom property in the component will look like a horizontal ruler
And the editor will make it easy to edit
Conclusion
Unity has almost endless possibilities for customizing the interface to simplify your life; however, do not forget about the cost of development. In our example, we replaced ten lines of the original version with List to 300 lines of custom editor code. So when deciding on the creation of custom editors, do not forget that any work takes time, and not only time for production, but also support. There is always the possibility of new bugs and API changes with the latest version of Unity. See you next time! =)